How To Take Great
Home Staging Photos
Home staging is all about first impressions: the prolonged online view, the initial gaze from the end of a driveway, and the immediate emotional response during the first few seconds within a home’s entrance.
Using their skills, education, and experience, USC™ Home Stagers create this impression by maximizing the positives and minimizing the negatives of any home. First impressions establish a connection — one that creates an invisible tether, drawing visitors towards envisioning the space as their new home.
In fact, the entire industry is built on first impressions, which extends to crucial marketing strategies. Given the visual nature of the product, Home Stagers rely on their own home staging photos to forge an immediate connection with potential clients. Such a connection can propel a Home Staging company towards success. So, how does one take great home staging photos?
Making a Great First Impression
Home staging photos, decorating snapshots, and professional organizing images — whether showcased on a website, social media, or in a portfolio — need to convey a powerful first impression. These photos articulate your story, flaunting your talent, and echoing your expertise not just as a Home Stager, Decorator & ReDesigner, or Professional Organizer, but also as a photographer.
These industries pivot on appearances. In home staging, it’s about the presentation of a home and the feelings it invokes in potential buyers. Staging photos should likewise focus on maximizing the home’s positives and minimizing its drawbacks. USC™ Home Stagers understand the power of these photos and the enhancements they can bring even before a camera clicks.
Before the Photo is Taken
Each of your staging, decorating, or organizing photos presents an opportunity to exhibit your work to potential clients. It’s essential that they highlight your adeptness in using colors, patterns, textures, and furniture arrangements to forge a warm, inviting home environment.
Every shot demands meticulous planning, considering factors like shooting position, composition, lighting, and depth.
Shooting Position
The stance you adopt while shooting influences the viewer’s perspective. While many assume standing offers the best viewpoint, it can often produce an unnaturally high perspective.
A more favorable approach is to kneel or squat, determining which position feels more ergonomic for you and which delivers a more lifelike perspective for the observer.
Composition
Composition is about arranging the elements in a photo to tell a story. Think about what you want the photo to say about the room.
Look around the room to find the main focus. What can you highlight to show your home staging skills? Remember, staging photos for your business are different from real estate photos. While real estate photos capture most of the room, staging photos show your ability to make a space feel like home.
A useful tool for this is the Rule of Thirds. It divides a photo into nine parts, helping you choose where to place the main focus. This makes the photo look balanced and captures the viewer’s attention. Many cameras, including iPhones, have this grid feature.
Lighting
Good lighting is key. It changes based on the time of day and where you take the shot from. Try different angles and times to find the best look for your photos. Avoid shadows to keep everything clear. Many cameras, including iPhones, have settings to help get the lighting right.
Depth
Photos don’t always look how you expect because they’re flat, but our eyes see in 3D. To make your photos feel more 3D, think in layers. Have something up front, in the middle, and at the back, and make sure they connect in a way that draws the viewer’s eye through the picture.
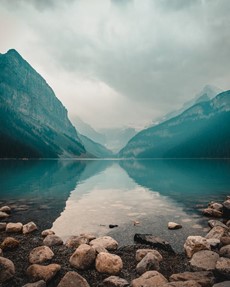
In this photo, the rocks and mud comprise the foreground, the water ripples in the middle ground, and the mountains stand majestically in the background. The three layers of the photo capture the depth of the landscape, and as they are connected, they pull the viewer’s eye through the photo.
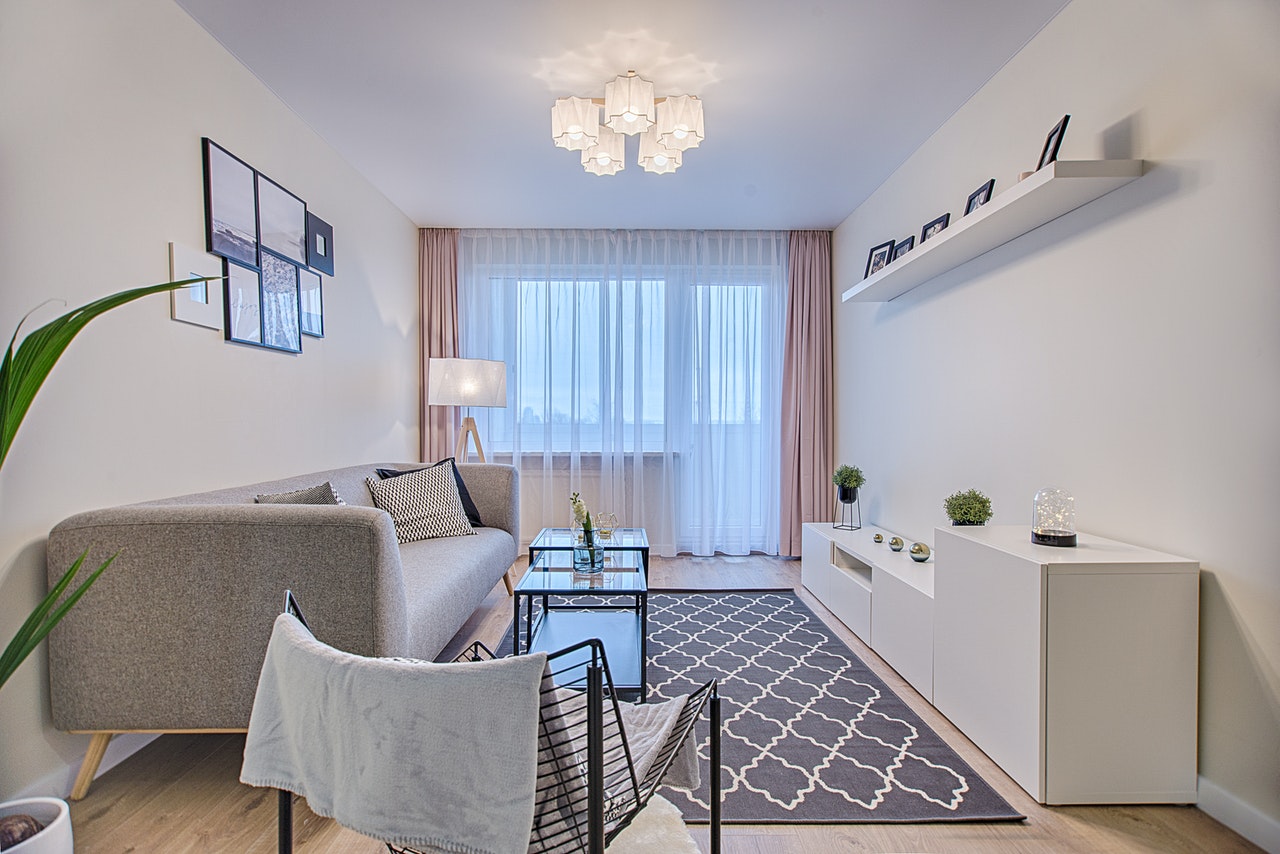
In this photo, the table is presented in the foreground, the stove rests in the middle ground, and the family room is observed in the background. Including the three layers creates depth and pulls the viewer’s eye through the photo.
Visual cues in each frame, detail the home’s characteristics. Without captions, the viewer can sense the warmth of the home, assess the amount of natural light, and evaluate its layout. With one photo, you have begun to tell the story of this sunlight-filled home.
Perspective can also create depth in a photo. Lines that disappear towards the horizon once again, draw the viewer’s eye through the photo. The lines also act as a directional feature; they point the way to the primary subject.

This photo captures two types of directional features. The line down the middle of the road points the viewer’s eye toward the primary subject. The two converging lines on the outside of the road creates depth.

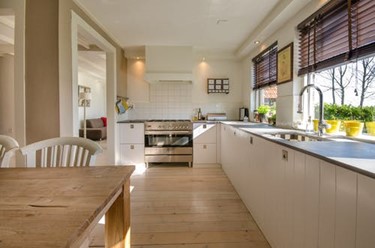
Taking the picture from this perspective in the kitchen, utilizes the lines on the floor. As they converge in the distance, they create depth. They also point the viewer’s eye towards the primary subject: the window and the incredible view it offers to the homeowners. The visual cues presented in this photo tell the story of a large, spacious home, complete with rustic features and a magnificent view.
USC™ Home Stagers, UDRC™ Decorators and UCPO™ Professional Organizers rely on showcasing their work through photos to generate business and build their brand. Like the first impression of a home-for-sale, these photos must create an instant connection with potential clients.
Learning how to take advantage of shooting position, composition, lighting, and depth, will help you to produce visually compelling photos. With practice and experience, your photos can tell the story of you and your successful company.